
Raspberry Pi with Monitor: DIY Projects
The Raspberry Pi, a versatile single-board computer, can power a variety of DIY projects. When combined with a monitor, the possibilities expand even further, from simple computers to more complex, interactive devices. Here are some creative and challenging projects you can build with a Raspberry Pi and a monitor.
1. Digital Picture Frame
Purpose: Display a slideshow of photos.
- Photo Slideshow: Displays locally stored photos, transitioning every 10 seconds.
- Manual Control: Capacitive touch sensor to switch photos and safely shut down.
- Ambient Light Sensitivity: Adjusts brightness based on room lighting.
Execution Steps:
- Assemble the Hardware:
- Connect the Raspberry Pi to the HDMI monitor.
- Attach the ambient light sensor and capacitive touch sensor to the Raspberry Pi GPIO pins.
- Mount the monitor in a wooden frame.
- Secure the setup with wall mounting brackets if desired.
- Install Software:
- Install the Raspbian OS on the Raspberry Pi.
- Use the terminal to install
fbifor image display:sudo apt-get install fbi - Write a Python script to control the sensors:
import RPi.GPIO as GPIO
import time

# Pin setup
touch_pin = 17
light_sensor_pin = 18

GPIO.setmode(GPIO.BCM)
GPIO.setup(touch_pin, GPIO.IN)
GPIO.setup(light_sensor_pin, GPIO.IN)

def handle_touch(channel):
    # Code to change image
    print("Touch detected")

def adjust_brightness():
    # Code to adjust brightness based on light sensor
    print("Adjusting brightness")

GPIO.add_event_detect(touch_pin, GPIO.RISING, callback=handle_touch)

try:
    while True:
        adjust_brightness()
        time.sleep(1)
except KeyboardInterrupt:
    GPIO.cleanup()
- Run the Picture Frame:
- Create a startup script to launch
fbion boot. Add the following to/etc/rc.localbefore theexit 0line:sudo fbi -T 1 -a /path/to/images/*.jpg - Configure the system to adjust brightness based on ambient light readings.
- Create a startup script to launch
2. Home Assistant Kiosk
Purpose: A dedicated control hub for smart home devices.
- Automatic Dashboard Display: Boots directly into the Home Assistant dashboard.
- Customizable: Add voice assistants, speakers, cameras, and more.
Execution Steps:
- Set Up Home Assistant:
- Install Home Assistant on the Raspberry Pi. Configure Home Assistant to connect to your smart home devices.
- Prepare the Kiosk Display:
- Connect the Raspberry Pi to the touch screen monitor.
- Install Chromium browser:
sudo apt-get install chromium-browser
- Automate Dashboard Launch:
- Create an autostart script to launch Chromium in kiosk mode:
@chromium-browser --kiosk --app=http://homeassistant.local:8123
- Create an autostart script to launch Chromium in kiosk mode:
- Customize the Setup:
- Add any additional hardware like speakers or cameras. Integrate with voice assistants if desired.
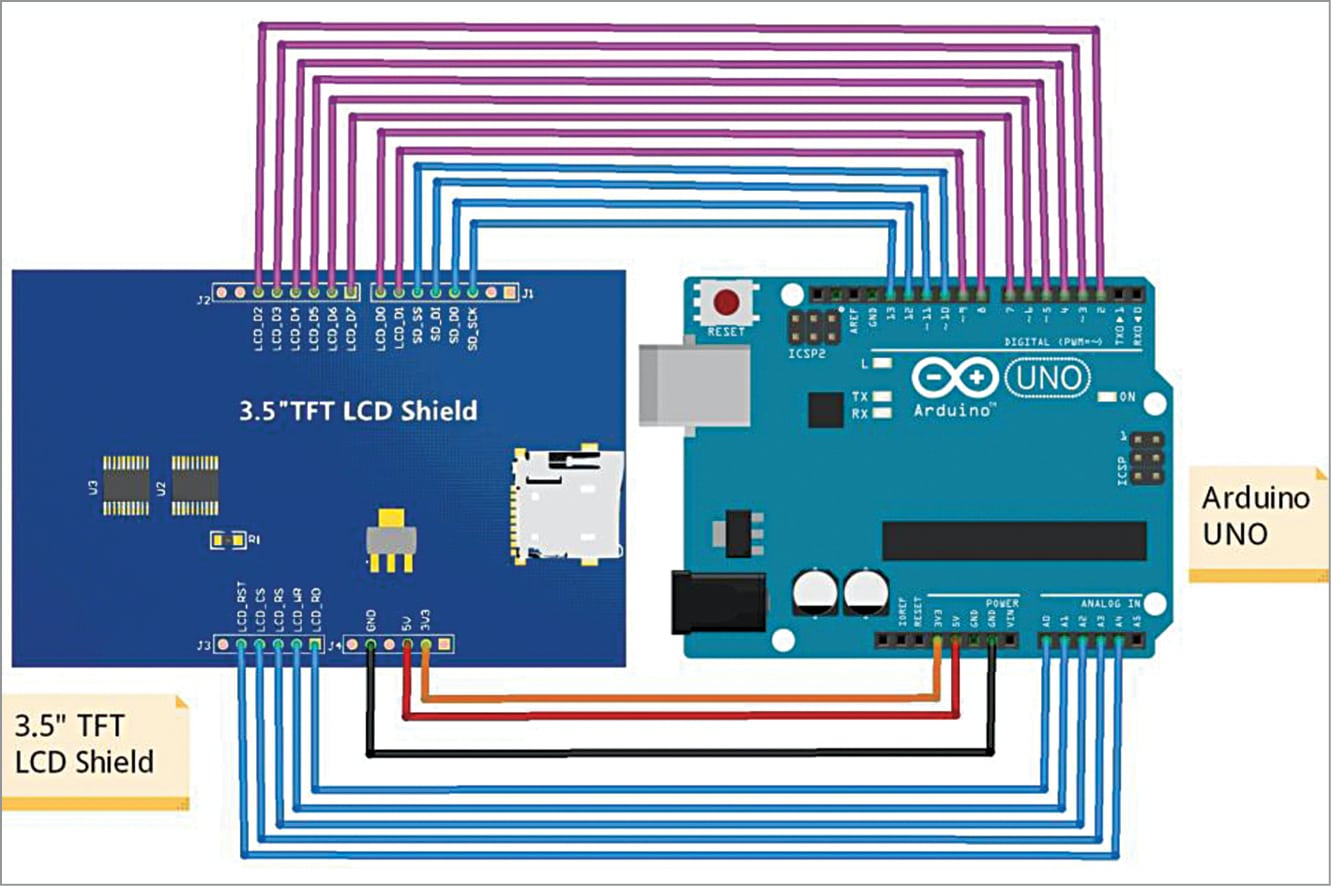
3. Digital Calendar Dashboard

Purpose: Display a modern and customizable digital calendar.
- 84-Day Calendar: Shows upcoming events and tasks.
- Additional Info: Local date and time, world time, local weekly weather, and to-do list.
Execution Steps:
- Assemble the Hardware:
- Connect the Raspberry Pi to any old screen you have.
- Set Up DAKboard:
- Create an account on DAKboard.
- Customize your dashboard with calendar events, weather, and to-do lists.
- Run DAKboard on Raspberry Pi:
- Install Chromium browser on the Raspberry Pi:
sudo apt-get install chromium-browser - Create an autostart script to launch Chromium in kiosk mode:
@chromium-browser --kiosk --app=https://dakboard.com/app
- Install Chromium browser on the Raspberry Pi:
4. Arcade Machine

Purpose: Build a retro gaming console.
- Retro Gaming: Play games from over 90 systems.
- Custom Controllers: Four-player setup with joysticks and buttons.
Execution Steps:
- Assemble the Hardware:
- Connect the Raspberry Pi to a monitor or TV.
- Set up the arcade kit with joysticks and buttons.
- Install Recalbox:
- Download Recalbox from the official website.
- Flash Recalbox to the Raspberry Pi’s microSD card.
- Configure Controllers:
- Follow Recalbox’s UI to set up your controllers.
- Download and add ROMs to the microSD card.
5. Car Backup Camera
Purpose: Install a rearview camera in your vehicle.
- Basic Setup: Simple video feed from the camera.
- Object Detection: Overlay distance markers or advanced object detection with OpenCV.
Execution Steps:
- Basic Setup:
- Connect the Raspberry Pi to a compatible camera and dashboard screen.
- Open the camera in video mode from the terminal:
raspivid -t 0
- Install OpenCV for Object Detection:
- Install OpenCV:
sudo apt-get install python3-opencv - Write a Python script to process video feed and overlay distance markers:
import cv2

cap = cv2.VideoCapture(0)

while(True):
    ret, frame = cap.read()
    # Process frame
    cv2.imshow('frame', frame)
    if cv2.waitKey(1) & 0xFF == ord('q'):
        break

cap.release()
cv2.destroyAllWindows()
- Install OpenCV:
6. DIY Laptop

Purpose: Build a portable Raspberry Pi laptop.
- Portable Computer: Fully functional laptop with a 7-inch touchscreen.
- Customization: Add any additional features as per requirement.
Execution Steps:
- Assemble the Hardware:
- Connect the Raspberry Pi to a 7-inch touchscreen monitor and power supply.
- Install the Raspberry Pi in a laptop shell or custom 3D-printed case.
- Install Software:
- Install the Raspbian OS on the Raspberry Pi.
- Install any additional software needed for your use case.
- Configure the System:
- Customize the desktop environment and settings to your preference.